Author: @Carsten
Revision: v1.0
Tested with:
- Icinga 2 v2.10.2-1
- MariaDB 10.3.10
Table of Contents
- Galera Cluster for IDO-Mysql and more
- Floating IPs (VIP)
- HAProxy for IDO-MySQL (or more)
- Configuration
- Use the VIPs for Icinga2, Icingaweb2, Director etc.
- ToDo
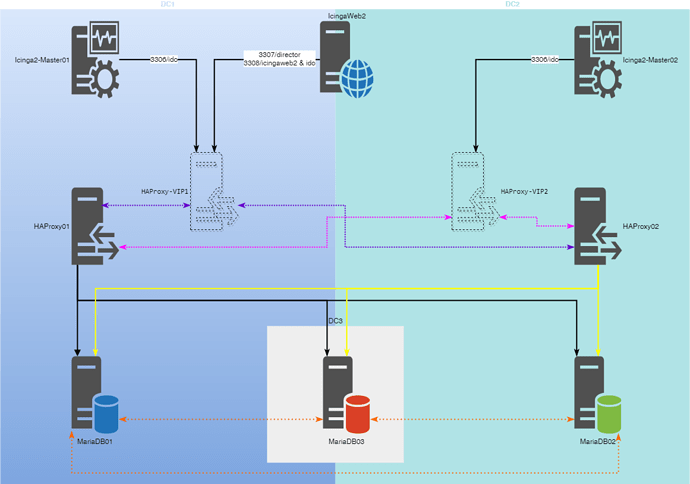
Galera Cluster for IDO-Mysql and more
This howto will show you how to setup a three node Galera cluster with a
floating ip created by keepalived and HAProxy for a maximum availability
of MySQL connection for IDO-MySQL, Icingaweb2 and any other application
that uses a MySQL database like Director, Grafana and many more
Requirements
The Galera Cluster documentaion tell us we need a minimum of 3 nodes to
create a cluster. Each node should run on a seperate hardware and if
possible in three different data centers. But if you have only 2 it will
also work, but dont let them run on the same hardware or hypervisor.
For HAProxy we create 2 a node “cluster” also for maximum availability ,
if you have 3 data centers you can extend it easily to 3 nodes.
SELinux & Firewall
This howto has SELinux and firewalls on the nodes disabled. If you want
to use them, its up to you to read the
Galera Documentation
about it
Nodes
For our installation edit the table of nodes below to fit your needs, you will need it later for the cluster
configuration.
| DataCenter | Server/Hypervisor Node | Node Name | IP |
|---|---|---|---|
| DC1 | ProxMox01 | MariaDB-Node01 | 192.168.178.55 |
| DC2 | ProxMox02 | MariaDB-Node02 | 192.168.178.56 |
| DC2 | ProxMox03 | MariaDB-Node03 | 192.168.178.57 |
| DC1 | ProxMox01 | HAProxy01 | 192.168.178.58 |
| DC2 | ProxMox02 | HAProxy02 | 192.168.178.59 |
| DC1 | HAProxy01 | HAProxy-VIP1 | 192.168.178.60 |
| DC2 | HAProxy02 | HAPeoxy-VIP2 | 192.168.178.61 |
Install & configure Galera Cluster
Enable Mariadb Repository
On each MariaDB node enable the repository that fits to your linux distribution, you can use the
MariaDB repository tool,
this how will use CentOS 7 (x86_64).
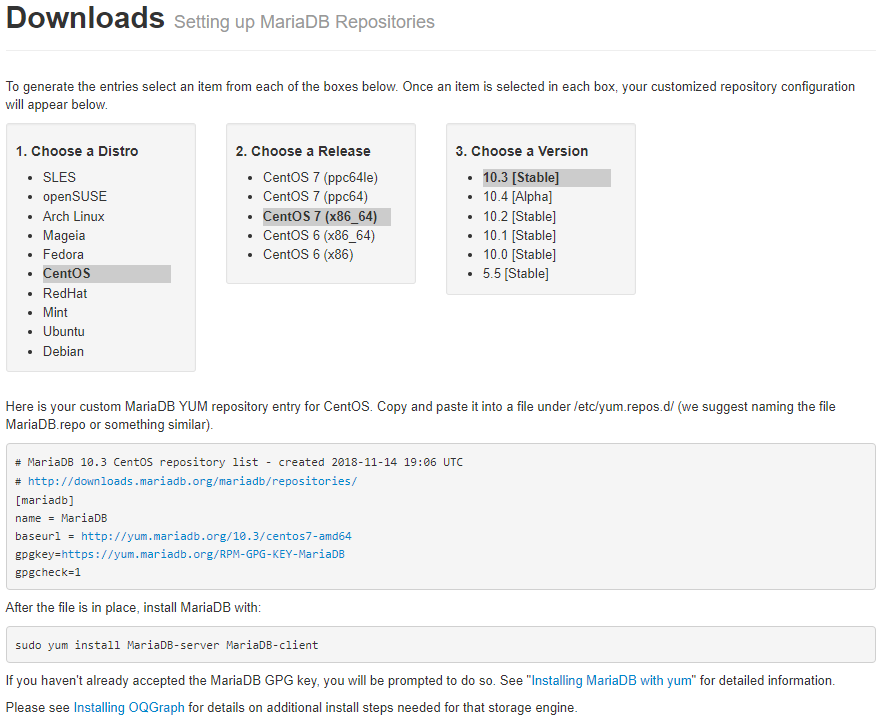
(Image 2)
Install MariaDb & Galera cluster filesets
Use the packet installer tool of your linux distribution, for CentOS this will install MariaDB and Galera cluster
yum install -y mariadb-server mariadb-client
Firstime start of MariaDB & secure setup
On each node start MariaDB and run the secure installation script. Answer all questions with yes and set the same root
password on all nodes.
[root@mariadb03 ~]# systemctl start mariadb
[root@mariadb03 ~]# mysql_secure_installation

NOTE: RUNNING ALL PARTS OF THIS SCRIPT IS RECOMMENDED FOR ALL MariaDB
      SERVERS IN PRODUCTION USE!  PLEASE READ EACH STEP CAREFULLY!

In order to log into MariaDB to secure it, we'll need the current
password for the root user.  If you've just installed MariaDB, and
you haven't set the root password yet, the password will be blank,
so you should just press enter here.

Enter current password for root (enter for none):
OK, successfully used password, moving on...

Setting the root password ensures that nobody can log into the MariaDB
root user without the proper authorisation.

Set root password? [Y/n]
New password:
Re-enter new password:
Password updated successfully!
Reloading privilege tables..
 ... Success!


By default, a MariaDB installation has an anonymous user, allowing anyone
to log into MariaDB without having to have a user account created for
them.  This is intended only for testing, and to make the installation
go a bit smoother.  You should remove them before moving into a
production environment.

Remove anonymous users? [Y/n]
 ... Success!

Normally, root should only be allowed to connect from 'localhost'.  This
ensures that someone cannot guess at the root password from the network.

Disallow root login remotely? [Y/n]
 ... Success!

By default, MariaDB comes with a database named 'test' that anyone can
access.  This is also intended only for testing, and should be removed
before moving into a production environment.

Remove test database and access to it? [Y/n]
 - Dropping test database...
 ... Success!
 - Removing privileges on test database...
 ... Success!

Reloading the privilege tables will ensure that all changes made so far
will take effect immediately.

Reload privilege tables now? [Y/n]
 ... Success!

Cleaning up...

All done!  If you've completed all of the above steps, your MariaDB
installation should now be secure.

Thanks for using MariaDB!
After this setup on each node you can stop MariaDB again on each node with
systemctl stop mariadb
Configure the Galera cluster
Edit on each node the mysql configuration (my.cnf), for Centos 7 the file is /etc/my.cnf.d/server.cnf. On each node
replace the ip of bind-address and wsrep_node_address to the ip of the node. Also replace wsrep_node_name with the
hostname of the node.
#
# These groups are read by MariaDB server.
# Use it for options that only the server (but not clients) should see
#
# See the examples of server my.cnf files in /usr/share/mysql/
#

# this is read by the standalone daemon and embedded servers
[server]

# this is only for the mysqld standalone daemon
[mysqld]

#Bind MariaDB daemon to the ip of the cluster node we use
bind-address=192.168.178.55
max_allowed_packet = 16M

[galera]
binlog_format=ROW
default-storage-engine=innodb
innodb_autoinc_lock_mode=2
query_cache_size=16M
query_cache_type=0
innodb_flush_log_at_trx_commit=0
innodb_buffer_pool_size=256M

#Galera settings
wsrep_on=ON
wsrep_provider=/usr/lib64/galera/libgalera_smm.so
wsrep_sst_method=rsync
wsrep_slave_threads=2

#SSL for Galera
#wsrep_provider_options="socket.ssl_key=/etc/mysql/ssl/server-key.pem;socket.ssl_cert=/etc/mysql/ssl/server-cert.pem;socket.ssl_ca=/etc/mysql/ssl/ca-cert.pem"

#Node name and ip
wsrep_node_address='192.168.178.55'
wsrep_node_name='mariadb01'

#Gluster name and node ips
wsrep_cluster_name='MariaDB_Cluster'
wsrep_cluster_address='gcomm://192.168.178.55,192.168.178.56,192.168.178.57'

[embedded]

# This group is only read by MariaDB servers, not by MySQL.
# If you use the same .cnf file for MySQL and MariaDB,
# you can put MariaDB-only options here
[mariadb]

# This group is only read by MariaDB-10.3 servers.
# If you use the same .cnf file for MariaDB of different versions,
# use this group for options that older servers don't understand
[mariadb-10.3]
Cluster tunings (not MySQL tunings)
To get the cluster as fast as possible, i recomend to use this settings:
innodb_flush_log_at_trx_commit=0 Ensure that the InnoDB log buffer is written to file once per second, rather than on
each commit, to improve performance. Read more about this at the Galera Documentation
In short you can loose up to 1 second of transaction in case of node crash or data center outtake. But you can recover
this data from other nodes (that hopefully did not go down at the same time).
wsrep_slave_threads=2 Set this variable to twice the number of CPU cores of your node. For example your node has 4
cpu, you set this to 8. This will speed up data replication between all cluster nodes
Creating the cluster
Starting the first node
depending on your linux distribution yo have to read the
documentation on howto start the first node.
For CentOS 7 it is:
systemctl stop mariadb
galera_new_cluster
you can check the clustersize with
[root@mariadb01 ~]# mysql -u root -p -e "SHOW STATUS LIKE 'wsrep_cluster_size';"
Enter password:
+--------------------+-------+
| Variable_name      | Value |
+--------------------+-------+
| wsrep_cluster_size | 1     |
+--------------------+-------+
Cluster node 1 is up and running if you get the same output.
Adding the other nodes
If the first node is up and running we can add the other nodes with a
simple
[root@mariadb02 ~]# systemctl stop mariadb
[root@mariadb02 ~]# systemctl start mariadb
You can control the clustersize again with:
[root@mariadb02 ~]# mysql -u root -p -e "SHOW STATUS LIKE 'wsrep_cluster_size';"
Enter password:
+--------------------+-------+
| Variable_name      | Value |
+--------------------+-------+
| wsrep_cluster_size | 2     |
+--------------------+-------+
If cluster size is now 2, you can repeat this steps on cluster node 3 Now your cluster is up and running, you can use it
from every node as you would do it with a single database server.
Recovery from failed nodes/cluster
Single node failed/crashed/went down
If a node is crashed/failed and at least one other Galera cluster node is still up and running, you can recover the
failed/crashed nodes by just starting it up again with
systemctl start mariadb
After it started up you can check the cluster size with
[root@mariadb02 ~]# mysql -u root -p -e "SHOW STATUS LIKE 'wsrep_cluster_size';"
Enter password:
+--------------------+-------+
| Variable_name      | Value |
+--------------------+-------+
| wsrep_cluster_size | 2     |
+--------------------+-------+
All nodes failed/crashed/went down at the sametime
If all nodes went down, you have to check the file /var/lib/mysql/grastate.dat on each node. The node which contins the
line safe_to_bootstrap: 1 can be started as first node again with
galera_new_cluster
Check the cluster size is 1 before you start the other nodes.
All nodes failed/crashed/went down at the sametime and no node has safe_to_bootstrap: 1
If there is no safe_to_bootstrap: 1 on any node you have to get the node with the highest recovered position number
with:
[root@mariadb02 ~]# sudo -u mysql mysqld --wsrep-recover
2018-11-14 21:54:13 0 [Note] mysqld (mysqld 10.3.10-MariaDB) starting as process 12633 ...
2018-11-14 21:54:13 0 [Warning] Could not increase number of max_open_files to more than 1024 (request: 4182)
2018-11-14 21:54:13 0 [Warning] Changed limits: max_open_files: 1024  max_connections: 151 (was 151)  table_cache: 421 (was 2000)
2018-11-14 21:54:13 0 [Note] InnoDB: Using Linux native AIO
2018-11-14 21:54:13 0 [Note] InnoDB: Mutexes and rw_locks use GCC atomic builtins
2018-11-14 21:54:13 0 [Note] InnoDB: Uses event mutexes
2018-11-14 21:54:13 0 [Note] InnoDB: Compressed tables use zlib 1.2.7
2018-11-14 21:54:13 0 [Note] InnoDB: Number of pools: 1
2018-11-14 21:54:13 0 [Note] InnoDB: Using SSE2 crc32 instructions
2018-11-14 21:54:13 0 [Note] InnoDB: Initializing buffer pool, total size = 256M, instances = 1, chunk size = 128M
2018-11-14 21:54:13 0 [Note] InnoDB: Completed initialization of buffer pool
2018-11-14 21:54:13 0 [Note] InnoDB: If the mysqld execution user is authorized, page cleaner thread priority can be changed. See the man page of setpriority().
2018-11-14 21:54:13 0 [Note] InnoDB: 128 out of 128 rollback segments are active.
2018-11-14 21:54:13 0 [Note] InnoDB: Creating shared tablespace for temporary tables
2018-11-14 21:54:13 0 [Note] InnoDB: Setting file './ibtmp1' size to 12 MB. Physically writing the file full; Please wait ...
2018-11-14 21:54:13 0 [Note] InnoDB: File './ibtmp1' size is now 12 MB.
2018-11-14 21:54:13 0 [Note] InnoDB: Waiting for purge to start
2018-11-14 21:54:13 0 [Note] InnoDB: 10.3.10 started; log sequence number 1653816; transaction id 1795
2018-11-14 21:54:13 0 [Warning] InnoDB: Skipping buffer pool dump/restore during wsrep recovery.
2018-11-14 21:54:13 0 [Note] Plugin 'FEEDBACK' is disabled.
2018-11-14 21:54:13 0 [Note] Server socket created on IP: '192.168.178.56'.
2018-11-14 21:54:13 0 [Note] WSREP: Recovered position: d542f659-e84b-11e8-a3c0-63d807a1f547:0
Start the Galera cluster on the node with the highest recoverd position
with
galera_new_cluster
and all the other nodes with
systemctl start mariadb
More information on howto recover failed nodes/clusters can be found in the
recovery documentation
Do’s and dont’s
- Never ever set MariaDB to autostart on node startup.
- Never stop all nodes at the same time
- Read the documentation
- Before you change anything to a MariaDB cluster/node make a fresh
backup - Cluster is not a backup, create backups of your databases regulary
- Asking someone for help is not a shame
Floating IPs (VIP)
For each data center we will create 1 floating IP to have the connectios as near as possible for each Icinga2 master
server. Keepalived will do the job for us and move the VIPs if needed.
Install keepalived
for CentOS 7 you can install it with
yum -y install keepalived
Configuration
We will configure each node without any iptable rules and a simple watch script to drop VIPs if HAProxy is not running.
Each Node will get one VIP that will be always on that node if HAProxy is also up and running.
Node 1: keepalived configuration
Change the routerid to match your host name, interface on both entries to match your interface name and also the
virtual_ipaddresses to match your environment (did you use your table from above?)
! Configuration File for keepalived
linkbeat_use_polling

global_defs {
   router_id haproxy01
   vrrp_skip_check_adv_addr
   vrrp_strict
   vrrp_garp_interval 0
   vrrp_gna_interval 0
   vrrp_iptables
}

vrrp_script chk_haproxy {
        script "pidof haproxy"
        interval 2
}

vrrp_instance VIP_1 {
    state MASTER
    interface ens32
    virtual_router_id 51
    priority 100
    advert_int 1
    authentication {
        auth_type PASS
        auth_pass 1111
    }
    track_script {
        chk_haproxy
    }
    virtual_ipaddress {
        192.168.178.60/24
    }
}

vrrp_instance VIP_2 {
    state BACKUP
    interface ens32
    virtual_router_id 52
    priority 50
    advert_int 1
    authentication {
        auth_type PASS
        auth_pass 2222
    }
    track_script {
        chk_haproxy
    }
    virtual_ipaddress {
        192.168.178.61/24
    }
}
Node 2: keepalived configuration
Change the routerid to match your host name and also the virtual_ipaddresses to match your environment (did you use
your table from above?)
! Configuration File for keepalived
linkbeat_use_polling

global_defs {
   router_id haproxy02
   vrrp_skip_check_adv_addr
   vrrp_strict
   vrrp_garp_interval 0
   vrrp_gna_interval 0
   vrrp_iptables
}

vrrp_script chk_haproxy {
        script "pidof haproxy"
        interval 1
}

vrrp_instance VIP_1 {
    state BACKUP
    interface ens32
    virtual_router_id 51
    priority 50
    advert_int 1
    authentication {
        auth_type PASS
        auth_pass 1111
    }
    track_script {
        chk_haproxy
    }
    virtual_ipaddress {
        192.168.178.60/24
    }
}

vrrp_instance VIP_2 {
    state MASTER
    interface ens32
    virtual_router_id 52
    priority 100
    advert_int 1
    authentication {
        auth_type PASS
        auth_pass 2222
    }
    track_script {
        chk_haproxy
    }
    virtual_ipaddress {
        192.168.178.61/24
    }
}
Enable & check if keepalived is working
Simple enable and start keepalived with (for CentOS 7):
systemctl enable keepalived
systemctl start keepalived
If you do ip addr show on your console, you will not see any of the VIPs we configured, because HAProxy is not
running. You can check if keepalived is up add running with systemctl status keepalived
[root@haproxy01 ~]# systemctl status keepalived
● keepalived.service - LVS and VRRP High Availability Monitor
   Loaded: loaded (/usr/lib/systemd/system/keepalived.service; disabled; vendor preset: disabled)
   Active: active (running) since Sun 2018-11-18 12:54:02 CET; 43min ago
  Process: 1546 ExecStart=/usr/sbin/keepalived $KEEPALIVED_OPTIONS (code=exited, status=0/SUCCESS)
 Main PID: 1547 (keepalived)
   CGroup: /system.slice/keepalived.service
           ├─1547 /usr/sbin/keepalived -D
           ├─1548 /usr/sbin/keepalived -D
           └─1549 /usr/sbin/keepalived -D

Nov 18 13:36:48 haproxy01 Keepalived_vrrp[1549]: /usr/sbin/pidof haproxy exited with status 1
Nov 18 13:36:50 haproxy01 Keepalived_vrrp[1549]: /usr/sbin/pidof haproxy exited with status 1
Nov 18 13:36:52 haproxy01 Keepalived_vrrp[1549]: /usr/sbin/pidof haproxy exited with status 1
Nov 18 13:36:54 haproxy01 Keepalived_vrrp[1549]: /usr/sbin/pidof haproxy exited with status 1
Nov 18 13:36:56 haproxy01 Keepalived_vrrp[1549]: /usr/sbin/pidof haproxy exited with status 1
Nov 18 13:36:58 haproxy01 Keepalived_vrrp[1549]: /usr/sbin/pidof haproxy exited with status 1
Nov 18 13:37:00 haproxy01 Keepalived_vrrp[1549]: /usr/sbin/pidof haproxy exited with status 1
Nov 18 13:37:02 haproxy01 Keepalived_vrrp[1549]: /usr/sbin/pidof haproxy exited with status 1
Nov 18 13:37:04 haproxy01 Keepalived_vrrp[1549]: /usr/sbin/pidof haproxy exited with status 1
Nov 18 13:37:06 haproxy01 Keepalived_vrrp[1549]: /usr/sbin/pidof haproxy exited with status 1